Successful establishment of forest tree plantings requires planning; a commitment of time and resources; and proper planting, maintenance and protection. Planting seedlings has advantages over direct seeding. A key advantage is that seedlings will more effectively compete with unwanted plants — such as grasses, shrubs and herbaceous plants — for moisture, sunlight and soil nutrients.
Forest tree seedlings are more likely to successfully establish and develop when these conditions are met:
- The site is properly prepared.
- Species appropriate for the site are selected.
- Quality seedlings are purchased.
- Seedlings are properly cared for and handled before, during and after planting.
- Proper planting techniques are used.
- Proper tree maintenance practices are followed.
The proper care, handling and planting of hardwood and pine seedlings, described in this guide, are basically the same. Any differences are pointed out.
Planting season
Hardwood seedlings must be planted in late winter or early spring, when the seedlings are dormant and the ground has thawed. In Missouri and neighboring states in the North Central Region of the United States (Illinois, Iowa, Kansas and Nebraska), this period lies between March and May; the exact dates will vary with latitude and weather conditions. During this period, soil moisture and air temperature are ideal for seedling growth and survival. A cool (35 to 60 degrees F) overcast day with little or no wind (less than 10 mph) provides an ideal setting for planting hardwood seedlings.
In most of Missouri, pine seedlings can also be planted in late winter or early spring, but in the southern counties bordering Arkansas, they can be planted in February.
Site preparation
Site preparation is an extremely important step in a successful tree planting project. You would not think of planting a garden without tilling and preparing the soil. The same applies to planting trees. Remove any competing grass and weeds that will rob new seedlings of moisture and nutrients so the newly planted seedlings will have a better chance of survival.
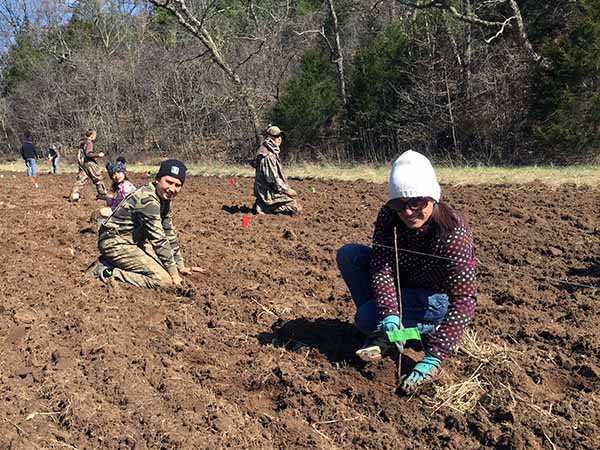
The two methods of site preparation are mechanical and chemical. Mechanical site preparation involves physically removing any competing vegetation from the planting site. For small plantings, remove sod and weeds from a spot 3 feet in diameter where each tree is to be planted. For larger plantings, plow or disk 3-foot-wide strips where the rows will be planted. Leaving vegetation between the rows will help prevent soil erosion. However, if your planting site is a level bottomland field, it is okay to prepare the entire area (Figure 1).
Chemical site preparation consists of using herbicides to control competing vegetation. Usually the herbicide is sprayed in a spot treatment around each seedling or in strips where the tree rows will be planted.
There are many different herbicides with many different characteristics. Some kill grass; others kill broadleaf weeds. Unfortunately, to herbicides designed to kill broadleaf weeds, a hardwood tree seedling “looks” like a broadleaf weed. So, selecting the right herbicide and applying it at the correct time and in the proper manner is crucial for hardwood tree plantings. If you are planting conifers, you have a little more leeway. Always contact a professional forester for the latest recommendations, and always follow label directions.
Seedling selection
Because a seedling obtains moisture and nutrients from the soil, it is important to match the species to the type of soil on your planting site. Some species, such as pecan, prefer wet soils. Others, such as shortleaf pine, grow best on drier soils. Most trees are able to tolerate growing in a wide range of soil types, but they will grow best on the soil types for which they are suited.
Also consider the amount of sunlight the seedlings will receive. Most trees prefer full sunlight, so planting trees in old fields is ideal. Other species, such as flowering dogwood or downy serviceberry, need shade and will likely die if planted in full sunlight. Once again, contact a professional forester for recommendations. Remember, right species, right place.
Planting seedlings at the proper time allows their root systems to become well established before being subjected to seasonal changes, such as high temperatures, low rainfall and excessive wind. Fall planting is not recommended because it introduces several possibilities of planting failure: frost heaving (swelling of the soil caused by repeated cycles of freezing and thawing), the drying out of seedlings, disease, wildlife damage and winter injury.
Avoid planting seedlings when the site is excessively wet or dry, as water-logging or drought stress can result in poor seedling survival and growth.
Bare-root vs. containerized seedlings
Bare-root seedlings
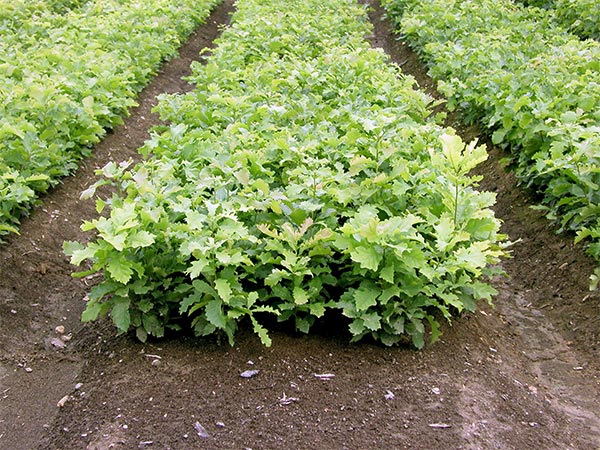
Bare-root seedlings are grown in a nursery bed, usually for one year (Figure 2). During that time, they are mechanically root-pruned 8 to 10 inches below the bed surface to stimulate lateral root development and make them easier to remove from the bed at the end of the growing season. Once the seedlings are lifted from the bed, they are graded and then packed into bundles to keep the roots moist. While awaiting shipment, they are stored in controlled environments of 33 to 40 degrees F with 85 to 95 percent humidity.
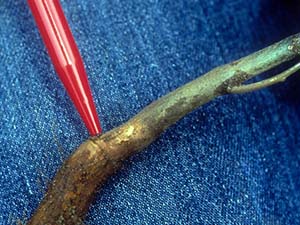
Table 1 details the ideal specifications of bare-root seedlings. Stem caliper thickness is measured just above the root collar (Figure 3). It is usually expressed in millimeters but is expressed in inches in Table 1 to be consistent with the other units of measure given there.
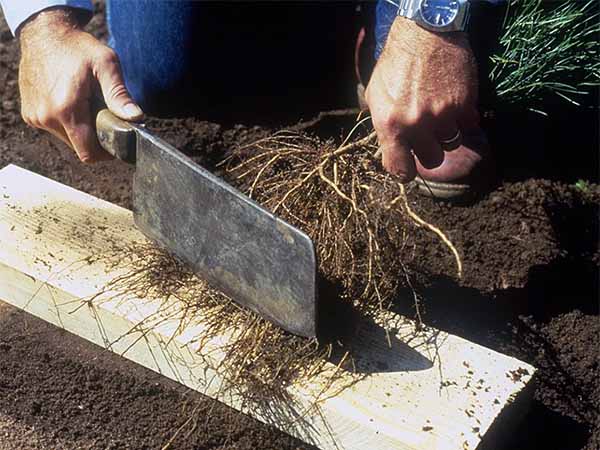
In addition to the specifications given in Table 1, the seedlings should have several well-developed lateral roots with numerous finer roots. As a result of the root pruning done in the nursery bed, lateral roots are often longer than the pruned tap root. To ensure these roots do not exceed the depth of the planting hole, some pruning may be needed (Figure 4).
Table 1. Bare-root seedling specifications.
| Tree type | Shoot height | Stem caliper* thickness | Root length | |
|---|---|---|---|---|
| Minimum | Preferred | Minimum | Minimum | |
| Hardwood | 18 inches | 18–24 inches | 6 mm (1/4 inch) |
8–10 inches |
| Pine | 8 inches | 8–10 inches | 3 mm (1/8 inch) |
6–8 inches |
| * Measured just above the root collar (the part of the root just below ground level) and usually expressed in millimeters (mm). | ||||
Containerized seedlings
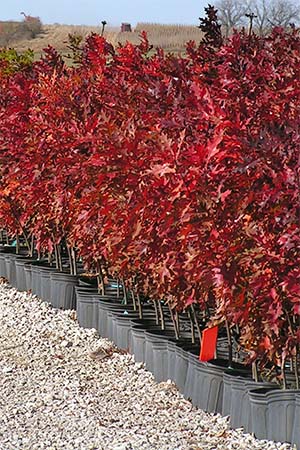
Containerized seedlings are grown and sold in a variety of containers, from tubes to multigallon pots (Figure 5). The techniques for transplanting them into the ground differ from those used for bare-root seedlings. Containerized seedlings cost more than bare-root seedlings, but in some cases, they are preferred. They experience less transplant shock, their fine roots are left intact (some of these can be lost during lifting of bare-root seedlings), and their roots retain moisture longer because they are never removed from the soil. These qualities are invaluable when planting on harsh sites; for restoration projects, such as land reclamation; or when planting in the fall, out of the dormant season. However, containerized seedlings are not recommended for large-scale plantings because of the increased expense.
When using containerized seedlings, be sure they were grown in large enough containers. A seedling grown in too small a container can become root-bound because the container restricts root growth, causing the roots to curl around the inside of the pot. Root-bound seedlings will not form good, vigorous root systems when planted. These seedlings may grow for several years in a field but then fail because they are unable to get enough water during droughts.
Bare-root seedling care and handling
Before planting
Bare-root seedlings are perishable and require careful handling to prevent their roots from drying out. These seedlings are stored in controlled environments (33 to 40 degrees F with 85 to 95 percent humidity) at tree nurseries until shipped or picked up. Before shipping seedlings, nursery personnel pack sphagnum moss or another type of moisture-retaining material around their roots, bundle the seedlings in packages, and place them in waterproof bags or boxes.
Once you have your seedlings, keep their roots protected and moist. Begin planting as soon as possible. If you must store the seedlings, follow these simple guidelines.
Storing seedlings for two weeks or less
If you need to store seedling for no more than two weeks, leave them in their shipping containers, and place them in a cool, shaded place.
- Separate the containers to avoid overheating and molding.
- Open each container, and spray enough cold water onto the roots to keep them moist. Do not overwater as doing so will damage the roots.
- Protect the seedlings from severe freezing.
Storing seedlings for more than two weeks
You have two options for storing seedlings longer than two weeks.
- Leave the seedlings in their shipping containers, and place them in cold storage at 35 to 37 degrees F.
- Alternatively, put the seedlings in a heeling-in trench (Figure 6).
- Water as often as necessary to keep soil moist, but avoid overwatering.
- Place mulch on the soil surface close to the trees to hold in moisture.
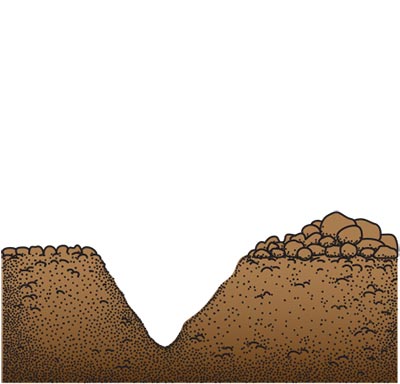 1. Dig a root-depth, V-shaped trench in a protected moist, shady place that is rodent-free.
 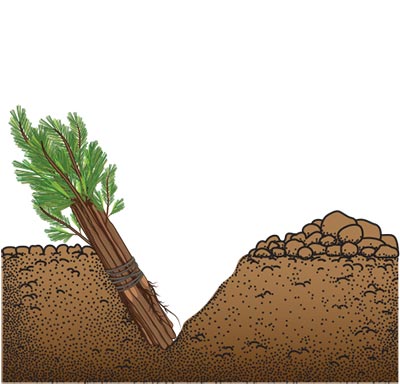 2. Spread seedlings evenly along one side of the trench.
 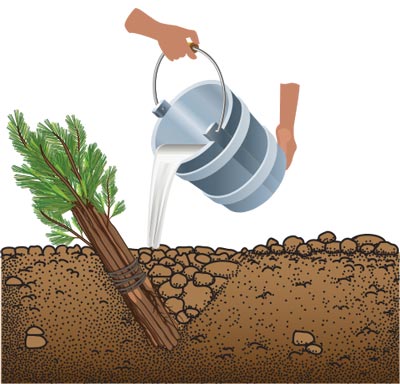 3. Fill the hole with loose soil, and water well.
 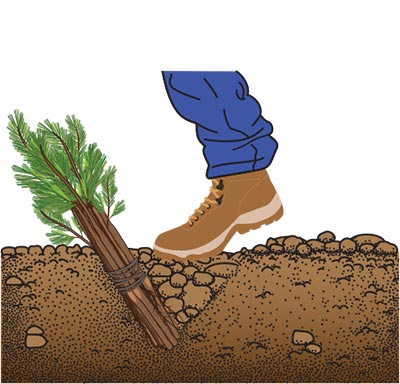 4. Finish filling the hole with soil, and firm the soil with your feet.
Figure 6. Storing tree seedlings in a heeling-in trench.
During planting
Proper care and handling of bare-root seedlings during the planting process is crucial to seedling survival. Planting on cool, overcast days helps minimize seedling exposure to harsh, drying conditions. Throughout the process, protect the seedling roots from drying out. Even brief exposure of the roots to direct sunlight can cause them to dry out and the seedling to die.
Move only as many seedlings from storage to the planting site as can be planted in one day. Remove seedlings from the nursery bundles and plant them immediately, or transfer them to a planting bag in which the roots can be kept moist. Gently separate seedlings from the bundle, keeping the lateral roots intact; do not root prune. Cover the roots with moist burlap, peat moss, or a similar material to protect them from drying out. Do not submerge root systems in buckets of water.
After planting
Watering helps newly planted tree seedlings thrive, but it might not be feasible for large-scale plantings.
Weed control for the first three to four growing seasons greatly increases seedling survival and growth. The minimum weed-free area around a seedling should be a 3- to 4-foot square or a circle of that diameter. On small-scale plantings, weed control can be done with mechanical tilling equipment; mulches; weed-barrier fabric; and chemical control, through applying herbicides with hand-held or backpack sprayers. On large planting sites, a tractor-mounted cultivator or disk will be required. After two years, however, a cultivator or disk might damage the tree roots. Herbicide application for large plantings is most easily done with a power sprayer mounted on or pulled behind a tractor.
Mowing is not weed control. Mowing increases sunlight to the seedlings but does not eliminate the root systems of plants competing for soil moisture and nutrients. Mowing can damage the seedlings. It also causes soil compaction and favors the establishment of grass, a severe competitor of trees.
Hand planting vs. machine planting
Bare-root seedlings can be planted by hand or machine. Planting by hand is appropriate for small sites; when tree-planting equipment is unavailable; or on sites that will not accommodate planting equipment. An experienced two-person hand-planting crew can typically plant 1,000 to 1,500 seedlings per day. For large plantation sites, use a tree planter. Three people can plant around 4,000 to 6,000 seedlings per day using a tractor and a mechanical planter.
Keep in mind these four basic needs when planting tree seedlings, whether by hand or machine:
- The hole or furrow should be large enough to accommodate the entire root system.
- The seedling should be planted with the root collar just below the soil surface.
- The roots need to be straight within the hole, not twisted or bent (J-rooted).
- The soil should be firmly packed around the seedling to avoid air pockets, which can cause the roots to dry out and thus kill the seedling.
Hand planting
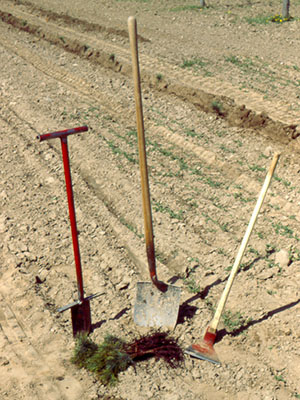
Various tools can be used for hand planting bare-root seedlings. The most common tools used are a dibble bar, a shovel and a grubbing hoe (Figure 7).
A dibble bar is the best tool to use to hand plant tree seedlings (Figure 8). Most dibbles have blades that are 3 to 4 inches wide and 10 to 11 inches long.
If you do not have access to a dibble bar, you can use a shovel (Figure 9) or a grubbing hoe (Figure 10).
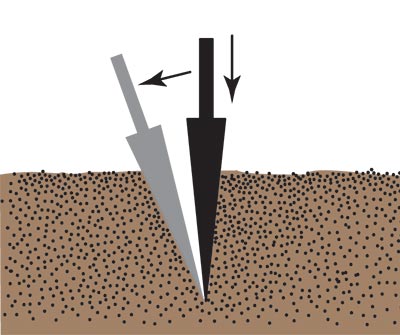 1. Insert the dibble bar straight down into the ground, and pull backward to open the hole.
 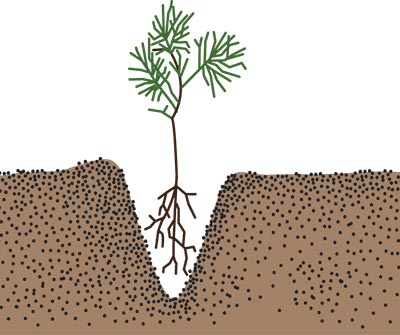 2. Remove the dibble, and place a seedling in the hole, keeping its roots straight.
 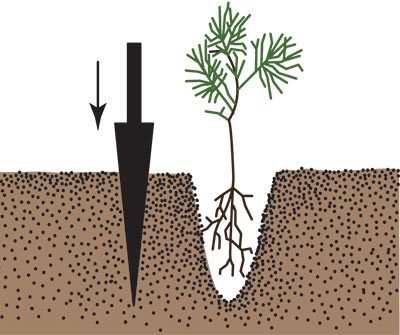 3. Insert the dibble straight down into the ground 3–4 inches from the hole with the seedling.
 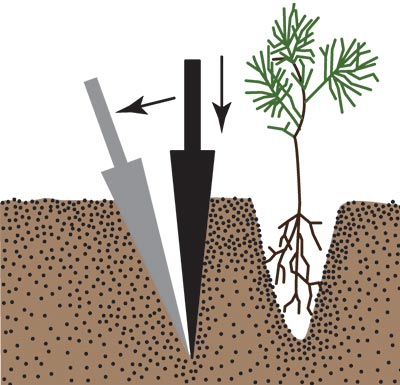 4. Pull the dibble backward (away from the seedling) to close the bottom of the hole.
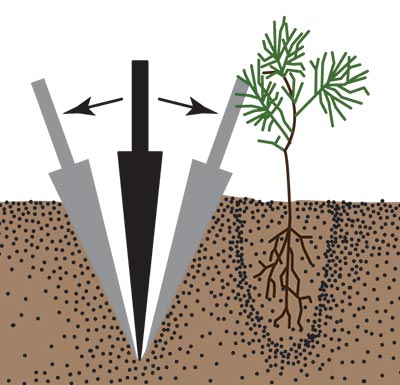 5. Push the dibble forward and backward to pack the soil firmly against the seedling’s root.
 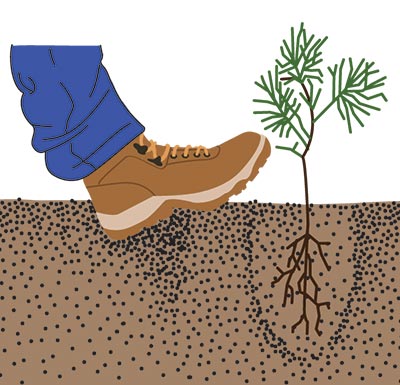 6. Fill in the second hole by firming it with the heel of your boot.
Figure 8. Planting a tree seedling with a dibble bar.
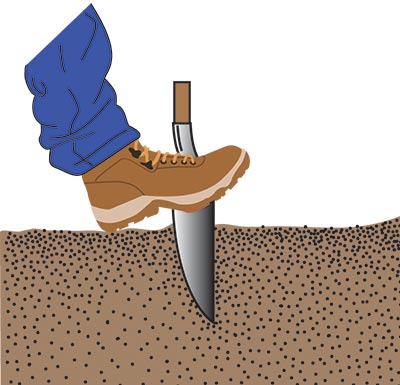 1. Insert the shovel straight down into the ground with the blade reversed.
 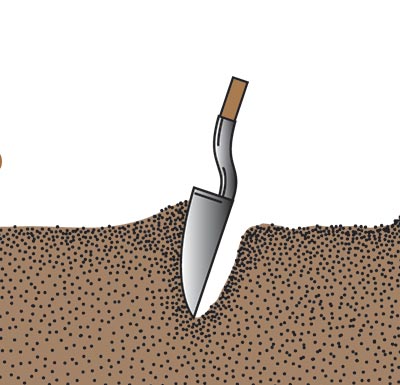 2. Push the handle away from you, and then pull the blade up to remove soil.
 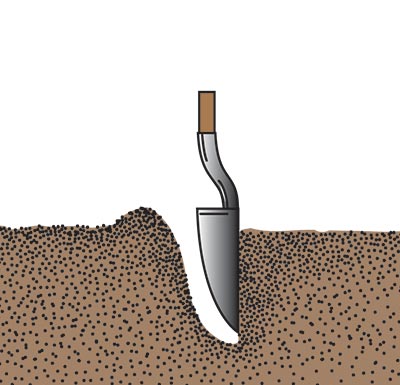 3. Make a second cut to straighten the opposite side of the hole.
 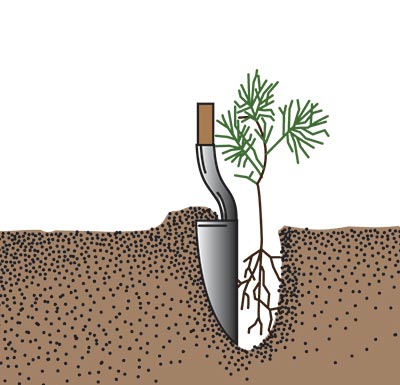 4. Pull the soil toward you, and hold the hole open with the shovel. Place a seedling in the hole with roots straight.
 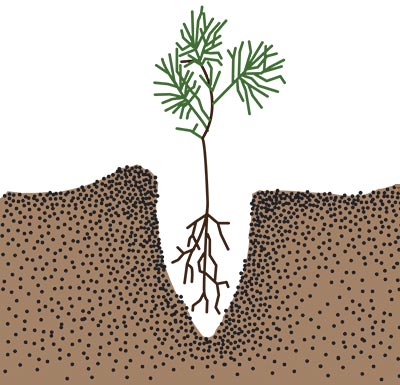 5. Remove the shovel, and fill the bottom half of the hole with soil.
 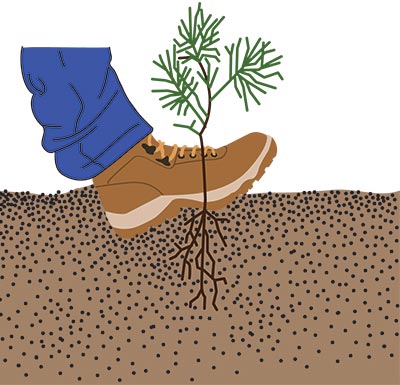 6. Firm the soil with your heel. Then fill the remainder of the hole and, again, firm the soil.
Figure 9. Planting a tree seedling with a shovel.
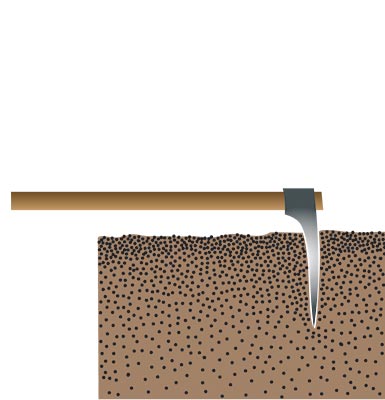 1. Drive the hoe into the soil the full length of the blade with the handle parallel to the ground.
 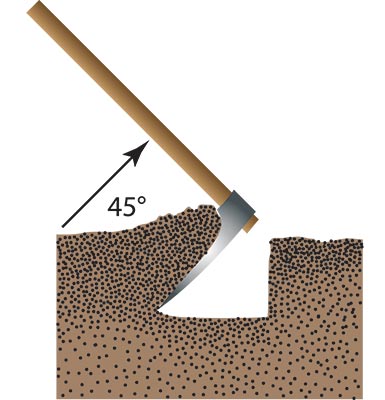 2. Placing a foot beside the blade, lift the handle 45 degrees and draw backward slightly.
 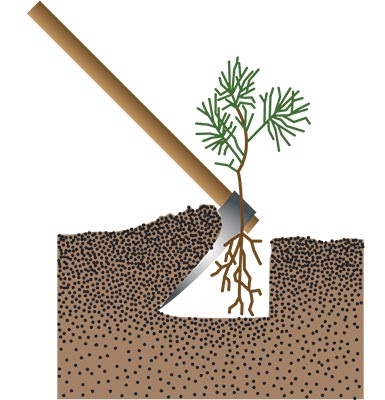 3. With the hoe still in place, insert a seedling with its roots against the side of the hole.
 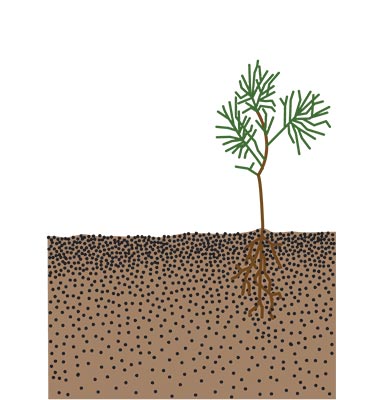 4. Remove the hoe, and allow the soil to fall back into the hole. Firm the soil with your feet.
Figure 10. Planting a tree seedling with a grubbing hoe.
Whichever tool you use, be sure the hole you create is deep enough that the seedling’s roots can go straight down into it without bending, or J-rooting. Plant seedlings at the same depth or ½ inch deeper than they grew in the nursery. A well-planted seedling should remain in the ground if gently tugged upward by its shoot. The seedling should also stand freely in a vertical position without support.
Hand planting is less expensive but more labor intensive than machine planting. Fewer seedlings can be planted per unit of time compared to machine planting. The planting depth can be adjusted for each seedling, but spacing is not precise and can vary widely by planting crew. Seedlings can be critically wounded during the hand-planting process, resulting in low seedling survival. The planting crew must handle the seedlings with great care to ensure they are kept moist, their roots are not injured when they are removed from the planting bags, and they are properly planted.
Machine planting
Machine planting involves the same basic steps as hand planting, except that mechanization is used to open and close the planting hole. Because a mechanical tree planter is a tool you will rarely use, the best source for one is your local Missouri Department of Conservation office. If the office does not have one on site, they can get one from another office for you to use.
A regular farm tractor with a three-point hydraulic hitch can pull a mechanical seedling planter like the one shown in Figure 11. It has a coulter disk that slices the soil surface, and a single narrow plow that opens a deep slit in the soil. Trencher plates on the plow hold the slit open so the planter operator can plant the seedling.
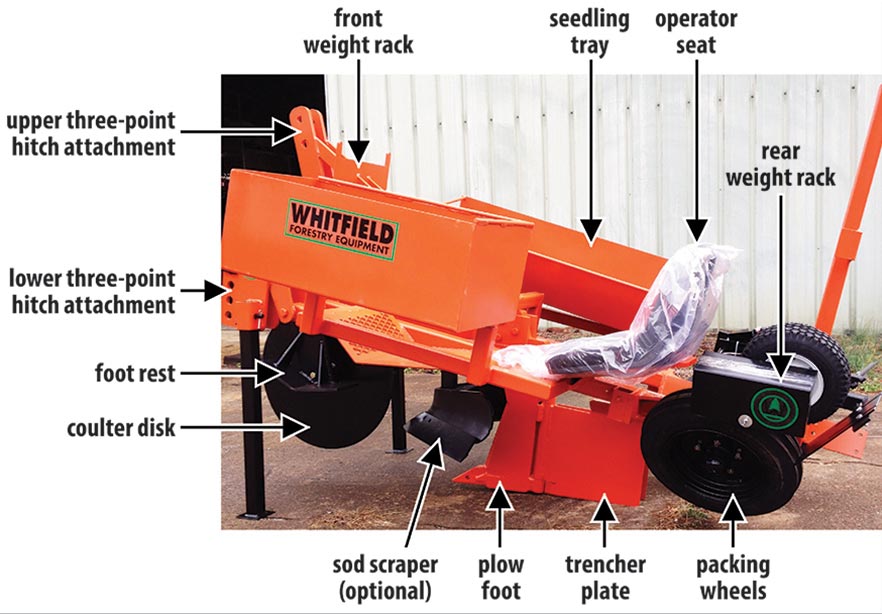
The operator uses one hand to plant and the other to hold seedlings in preparation for planting. The operator takes several seedlings from the seedling tray and holds them in the nonplanting hand. In preparation for planting, the operator transfers a single tree to the planting hand, holding it between forefinger and thumb at about root-collar. The operator then places the seedling in the ground between the wings on the plow, well forward of the soil that falls in the trench, and holds the seedling upright until the packing wheels passes it. The packing wheels, at the rear of the plow, compress the soil back into place around the roots as the planter moves along.
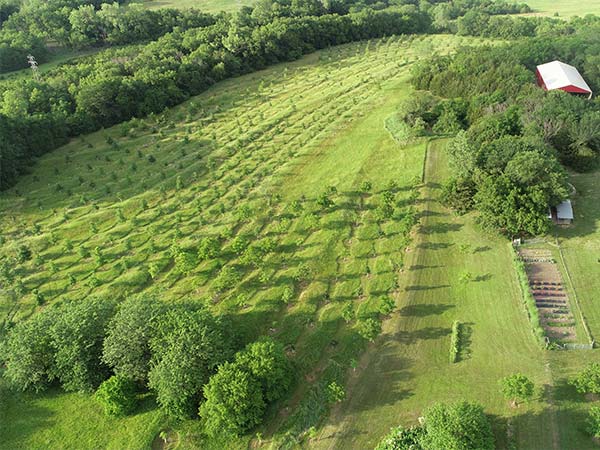
Site conditions must be favorable to use a machine planter. Planting machines might not operate properly at sites with heavy debris, stumps, heavy clay soil, steep or gullied slopes, rocks, and logging slash. An erosion hazard is often created when trees are planted in rolling or hilly ground. Planting rows are likely to become waterways when slopes are greater than 5 percent; on such sites, it is best to plant perpendicular to the slope (Figure 12).
Machine planting is less labor intensive than hand planting. It allows more seedlings to be planted per unit of time and can produce a higher survival rate of seedlings. It also permits precise spacing and planting depths.
A work crew of three usually is used in machine planting: a tractor operator, a tree planter, and a tree packer who follows the machine to check the planting work and correct poorly planted seedlings.
Before beginning to plant, check that the planter is in good condition and correctly setup:
- Plow foot
- Angle is correct.
- Alignment with coulter and trencher plates is correct.
- Foot does not show signs of excessive wear.
- Bolts are securely tightened.
- Packing wheels
- Bearings are greased.
- Wheels move freely and are not mud-packed.
- Tires are properly inflated.
- Coulter disk
- Bearings are greased.
- Coulter does not show signs of excessive wear.
- Vertical alignment is correct.
- Coulter moves freely.
Tractor speed affects quality of planting. It is important to have a tractor with enough power to pull steadily at slow speeds.
Some factors that determine planting rates are soil quality and condition; presence of stumps, stones, etc.; size and condition of planting stock; and skill of the planter operator. When the planting rate is too fast, many trees will be planted shallow or flat. The speed of the planting machine must be geared to the operator’s ability to place the trees properly.
Proper spacing can be determined in several ways:
- Various marking devices that attach to the tractor or planter can be used to determine space between rows.
- If the ground is soft, the tractor wheel prints can be used.
- Cross lines can be laid out with a cultivator shovel.
- Bell devices can be placed on the planter or tractor wheels.
- A tree-planting rhythm that gives fairly accurate spacing can be developed.
- After planting, walk each row:
- Check for proper planting depth and root position.
- Be sure trees are in a vertical position with the soil properly packed around the roots.
- Ensure the planting furrow is not filled with trash or debris.
Table 2 lists corrections for some common problems encountered when using a mechanical tree planter.
Table 2. Suggested corrections to common problems of mechanical tree planters.
| Problem | Correction |
|---|---|
| Packing wheels do not track and perhaps even run over trees. |
|
| Trees are planted shallow or flat. |
|
| Trees are planted too deep. |
|
| Planting slit is not closing (most often occurs in heavy sods and soils). |
|
| Trash and old grass packs between the coulter and the leading edge of trencher. |
|
| Dirt piles up between the trencher and the packing wheels (most common on plowed and disked ground). |
|
Summary
A successful forest tree planting begins with proper site preparation and selection of species appropriate for your locale and the site. Whether the seedlings are bare-root or in containers, they should have a well-developed and vigorous root system, and a shoot free from disease, insect and mechanical damage. Planting can be done by hand or machine; just make sure the planting hole has been properly closed to ensure good root contact with the soil. Remember, the best time to plant a tree was 50 years ago. The second best time is today.
For more information on selecting tree species, refer to MU Extension publication G5006, Right Species, Right Place: Considerations Before You Order Tree Seedlings in Missouri.
This publication revises and replaces MU Extension publications G5008, How to Plant Forest Trees, and G5009, Mechanical Tree Planters.