Composting is a natural biological process where bacteria, fungi and other organisms decompose organic materials such as leaves, grass clippings, and food wastes. The end product is called compost. While composting occurs naturally, the process can be accelerated and improved by human intervention.
Composting methods
Compost can be made by five different methods: holding units, turning units, heaps, soil incorporation, and worm composting. The method of composting selected will depend on when finished compost is desired, the materials to be composted, and the space available for composting.
Alternatives to composting
Remember, many organic materials such as leaves, grass clippings and chipped branches can be used as a mulch Mulches placed on the soil surface control weeds, reduce evaporation, make soil temperature cooler in summer and warmer in winter, and reduce soil erosion.
In addition, grass clippings do not need to be collected for composting. Grass clippings will filter down to the soil and rapidly decompose if you mow frequently, fertilize properly and remove no more than one-third of the leaf blade.
Selecting a compost method
Holding unit
Containers or bins that hold yard and garden materials until composting is complete. Allow 6 months to 2 years for finished without turning.
Easy to build and least labor intensive. Good for small compost amounts of yard wastes. Slowest way to compost.
Wire-mesh holding unit
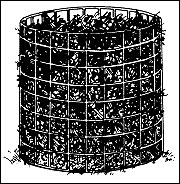 Figure 1
A wire-mesh holding unit.
A wire-mesh holding unit (Figure 1) is inexpensive and easy to build out of either galvanized chicken wire or hardware cloth. Non-galvanized chicken wire also can be used, but it will not last as long. Posts provide more stability for a chicken-wire bin, but make the bin difficult to move. A wire-mesh bin made without posts is easy to lift and provides access to finished compost at the bottom of the pile while the compost at the top of the pile is still decomposing.
Materials
- 10-foot length of 36-inch-wide 1-inch galvanized chicken wire, or
- 10-foot length of 1/2-inch-wide hardware cloth (note: This will make a bin with a diameter of 3 feet)
- Heavy wire for ties
- Three or four 4-foot-tall wooden or metal posts (for chicken wire bin)
Tools
- Heavy-duty wire or tin snips
- Pliers
- Hammer (for chicken wire bin)
- Metal file (for hardware cloth bin)
- Work gloves
To build a wire-mesh unit with chicken wire
- Fold back 3 to 4 inches of wire at each end of the cut piece to provide a strong, clean edge that will not poke or snag and that will be easy to latch.
- Stand the wire in a circle and set it in place for the compost pile.
- Cut the heavy wire into lengths for ties. Attach the ends of the chicken wire together with the wire ties, using pliers.
- Space wood or metal posts around the inside of the chicken-wire circle. Holding the posts tightly against the wire, pound them firmly into the ground to provide support.
To build a wire-mesh unit with hardware cloth
- Trim the ends of the hardware cloth so that the wires are flush with a cross wire to get rid of edges that could poke or scratch hands. Lightly file each wire along the cut edge to ensure safe handling when opening and closing the bin.
- Bend the hardware cloth into a circle, and stand it in place for the compost pile.
- Cut the heavy wire into lengths for ties. Attach the ends of the hardware cloth together with the wire ties, using pliers.
Snow-fence holding unit
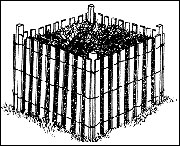 Figure 2
A snow-fence holding unit.
A snow-fence holding unit (Figure 2) is simple to make. It works best with four posts pounded into the ground for support.
Materials
- Four wooden or metal posts, 4 to 5 feet long (use pressure-treated lumber for the wooden posts)
- Heavy wire for ties
- A 13-foot length of snow fencing, at least 3 feet tall
Tools
- Heavy-duty wire or tin snips
- Pliers
- Sledge hammer
- Work gloves
To build a snow-fence holding unit
- Choose a 3-foot-square site for your holding unit and pound the four wooden or metal posts into the ground 3 feet apart, at the corners of the square.
- Cut the heavy wire into lengths for ties. Attach the snow fence to the outside of the posts with the wire ties, using pliers.
- Attach the fence ends together in the same way, forming a 3-foot-square enclosure.
Wood and wire three-bin turning unit
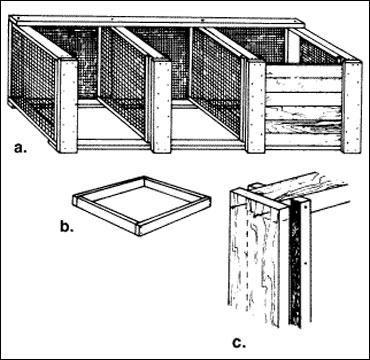 Figure 3
A wood and wire three-bin turning unit.
A wood and wire three-bin turning unit can be used to quickly compost large amounts of yard, garden and kitchen wastes. Although relatively expensive to build, it is sturdy, attractive and should last a long time. Construction requires basic carpentry skills and tools.
Materials
- Four 12-foot lengths of pressure-treated 2 x 4 lumber
- Two 10-foot lengths of pressure-treated 2 x 4 lumber
- One 10-foot length of construction-grade 2 x 4 lumber
- One 16-foot length of 2 x 6 lumber
- Six 8-foot lengths of 1 x 6 lumber
- A 22-foot length of 36-inch-wide 1/2-inch hardware cloth
- 16d galvanized nails (2 pounds)
- Poultry wire staples (250)
- Twelve 1/2-inch carriage bolts, 4 inches long, with washers and nuts
- One quart wood preservative or stain
Materials for optional lids
- One 4-x-8-foot sheet of 1/2-inch exterior plywood
- One 4-x-4-foot sheet of 1/2-inch exterior plywood
- Six 3-inch zinc-plated hinges
- Twenty-four 3/16-inch galvanized steel bolts, with washers and nuts
Tools
- Tape measure
- Hand saw or circular power saw
- Hammer
- Tin snips
- Carpenter's square
- Drill with 3/16-inch and 1/2-inch bits
- Screwdriver
- Adjustable wrench
- Pencil
- Safety glasses, ear protection, dust mask, and work gloves
To build a wood and wire three-bin system
- Cut two 31-1/2-inch and two 36-inch pieces from a 12-foot length of pressure-treated 2 x 4 lumber. Butt-joint and nail the four pieces into a 35-inch x 36-inch "square" (Figure 3b). Repeat, building three more frames with the remaining 12-foot lengths of 2 x 4 lumber.
- Cut four 37-inch lengths of hardware cloth. Fold back the edges of the wire 1 inch. Stretch the pieces of hardware cloth across each frame. Make sure the corners of each frame are square and then staple the screen tightly into place every 4 inches around the edge. The wood and wire frames will be dividers in your composter.
- Set two dividers on end, 9 feet apart and parallel to each other. Position the other two dividers so that they are parallel to and evenly spaced between the end dividers. Place the 36-inch edges on the ground. Measure the position of the centers of the two inside dividers along each 9-foot edge.
- Cut a 9-foot piece from each 10-foot length of pressure-treated 2 x 4 lumber. Place the two treated boards across the tops of the dividers so that each is flush against the outer edges. Measure and mark on the 9-foot boards the center of each inside divider.
- Line up the marks, and through each junction of board and divider, drill a 1/2-inch hole centered 1 inch from the edge. Secure the boards with carriage bolts, but do not tighten them yet. Turn the unit so that the treated boards are on the bottom.
- Cut one 9-foot piece from the 10-foot length of construction-grade 2 x 4 lumber. Attach the board to the back of the top by repeating the process used to attach the base boards. Using the carpenter's square, or measuring between opposing corners, make sure the bin is square. Tighten all the bolts securely.
- Fasten a 9-foot length of hardware cloth to the back side of the bin, with staples every 4 inches around the frame.
- Cut four 36-inch-long pieces from the 16-foot length of 2 x 6 lumber for front runners. (Save the remaining 4-foot length.) Rip-cut two of these boards to two 4-3/4-inch-wide strips (save the two remaining strips).
- Nail the 4-3/4-inch-wide strips to the front of the outside dividers and baseboard so that they are flush on the top and the outside edges. Center the two remaining 6-inch-wide boards on the front of the inside dividers flush with the top edge and nail securely (Figure 3c).
- Cut the remaining 4-foot length of 2 x 6 lumber into a 34-inch-long piece, and then rip-cut this piece into four equal strips. Trim the two strips saved from Step 8 to 34 inches. Nail each 34-inch strip to the insides of the dividers so that they are parallel to, and 1 inch away from, the boards attached to the front. This creates a 1-inch vertical slot on the inside of each divider.
- Cut the six 8-foot lengths of 1 x 6 lumber into 18 slats, each 31-1/4 inches long. Insert the horizontal slats, six per bin, between the dividers and into the vertical slots.
- (Optional) Cut the 4-x-8-foot sheet of exterior plywood into two 3-x-3-foot pieces. Cut the 4-x-4-foot sheet of exterior plywood into one 3-x-3-foot piece on one of the three bins, and attach each to the back, top board with two hinges.
- Stain all untreated wood.
Turning unit
A series of bins or a rotating bin that allows organic material to be turned on a regular schedule.Two general forms: either a series of bins, as shown in Figure 3a, or a horizontally mounted rotating barrel, as shown in Figure 4.
With a substantial input of labor, a large volume of yard waste can be composted in a relatively short time (3 weeks to 6 months). Turning bins can require a greater expense to buy or effort to build.
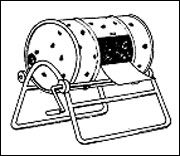 Figure 4
A rotating barrel composter.
Worm composting
Food wastes can be digested by red worms (red wigglers) placed in a bin with shredded and moistened newspaper, corrugated cardboard, peatmoss or sawdust. Requires temperatures between 50 and 70 degrees Fahrenheit so a basement or semi-heated indoor space is required. Worm bin (Figure 5a)
Small amounts of worms turn fruit and vegetable scraps into a high-quality soil amendment. Generally, every pound of food waste to be composted per week will require 1 square foot of surface area. Two pounds of worms are needed for every pound of garbage produced per day.
Heaps
No structure is required for heap composting. The pile should be at least 3 feet high and 3 feet wide; its length will vary depending upon the amount of material used. Heaps (Figure 6)
Least expensive way to compost as no physical structure is needed. Heaps may not appear as neat and tidy as using a bin(s) for composting. Composting will be faster if the heap is turned regularly.
Soil incorporation
Non-fatty food wastes can be buried at least 8 inches below ground level. Burying at least 8 inches discourages animals from digging up the waste. Soil incorporation (Figure 7)
Good method for disposing of small amounts of food wastes. Mix soil with the food waste to hasten decomposition. Wastes break down in one month to one year depending on soil temperatures, number of organisms in soil, and the carbon content of the wastes. Do not bury meat, bones or other fatty materials as it may attract pests.
Worm composting bin
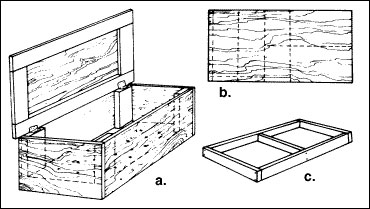
Figure 5
A worm composting bin.
Worm composting is suitable for composting fruit and vegetable scraps. The worms eat kitchen scraps, turning the material into valuable organic matter.
Materials
- One 4-x-8-foot sheet of 1/2-inch exterior plywood
- One 12-foot length of 2 x 4 lumber
- One 16-foot length of 2 x 4 lumber
- 16d galvanized nails (1/2 pound)
- 6d galvanized nails (2 pounds)
- Two galvanized door hinges
- One pint of clear varnish (optional)
- Plastic sheets for placing under and over the bin (optional)
- One pound of worms for every 1/2 pound of food wastes produced per day. (The classified sections of many popular fishing and gardening magazines contain current listings of firms that market red worms.)
- Bedding for worms: peat moss, brown leaves, moistened, shredded newspaper or moistened, shredded cardboard
Tools
- Tape measure
- Skill saw or hand saw
- Hammer
- Sawhorse
- Long straight-edge or chalk snap line
- Screwdriver
- Drill with 1/2-inch bit
- Eye and ear protection
- Work gloves
- Paint brush (optional)
To build a worm composting bin
- Measure and cut the plywood as shown in Figure 5b, so that you have one 24-x-42 inch top, one 24-x-42-inch base, two 16-x-24-inch ends, and two 16-x-42-inch sides.
- Cut the 12-foot length of 2 x 4 lumber into five pieces: two 39-inch pieces, two 23-inch pieces and one 20-inch piece. Cut the 39 and 23-inch pieces first. The 20-inch piece will then be 1/2 inch short due to sawing loss, but can still be nailed in easily.
- Lay the five pieces on edge on a flat surface to form a rectangle, with the long pieces on the inside and the 20-inch length centered parallel to the ends. Nail the pieces together with two 16d nails at each joint.
- Nail the 23-x-42-inch piece of plywood onto the frame with 6d nails every 3 inches.
- Cut four 1-foot lengths from the 16-foot length of 2 x 4 lumber (save the remaining 12-foot piece). Take the two 16-x-42-inch pieces of plywood and place a 1-foot length flat against each short end and flush with the top and side edges. Nail the 2 x 4s in place using 6d nails.
- Set the plywood sides up against the base frame so that the bottom edges of the 2 x 4s rest on top of the base frame and the bottom edges of the plywood sides overlap the base frame. Nail the plywood sides to the base frame using 6d nails.
- To complete the bin, nail the 16-x-24-inch pieces of plywood onto the base and sides at each end.
- To reinforce the bin, stagger nails at least every 3 inches wherever plywood and 2 x 4s meet.
- Drill twelve 1/2-inch holes through the plywood bottom of the bin for drainage.
- To build lid frame, cut the 12-foot piece (from the 16-foot length) of 2 x 4 lumber into two 45-inch pieces and two 20-inch pieces. Lay the pieces flat, forming a rectangle with the short pieces inside.
- Lay the 24-x-42-inch piece of plywood on top of the lid frame so that the plywood is 1-1/2 inches inside all the edges of the frame. Nail the plywood onto the frame with 6d nails.
- Attach the hinges to the inside of the back of the bin at each end (on the 2 x 4), and the corresponding undersides of the back edge of the lid frame, so that the lid stands upright when opened.
- The unfinished bin should last for at least five years; finishing the bin with varnish or polyurethane will protect the wood and prolong the life of the bin. Two coats of varnish with a light sanding between coats should be sufficient. If pressure-treated lumber is used, the bin will last years longer.
- Find a good location for the bin. It can be placed anywhere, as long as the temperature is more than 50 degrees Fahrenheit (10 degrees Celsius). The most productive temperature is between 55 degrees Fahrenheit and 77 degrees Fahrenheit. Garages, basements and kitchens are all possibilities, as well as the outdoors in warm weather (not in direct sunlight). Make sure to place the bin where it is convenient for you to use. It is wise to place a plastic sheet under the bin.
Adding the worms
Moisten the bedding material by placing it in a 5-gallon bucket and adding water to achieve a 75 percent water content, by weight. Weight the dry material and multiply the weight by three to determine the weight of the water to add. If the material cannot be weighed, or if it is already wet, add enough water to dampen all the bedding. Excess moisture will drain off most materials when they are placed into the composting bin; however, peat moss may hold too much water.
It is a good idea to put wet bedding material into the bin outdoors and wait until all the water has drained out (one to two hours) before setting the bin up indoors. Add about 8 inches of moistened bedding to the bottom of the bin. Place the worms on top of the bedding, and leave the lid off for a while. The worms will work down into the bedding, away from the light.
Adding your wastes
Dig a small hole in the bedding and add your vegetable and fruit scraps. Then cover the hole with bedding. Small amounts of meat scraps can be added in the same way. Do not add any inorganic or potentially hazardous materials, such as chemicals, glass, metal, or plastic.
Maintaining your worm composting bin
Keep your compost pile moist, but not wet. If flies are a problem, place more bedding material over the wastes, or place a sheet of plastic over the bedding. As an alternative, try placing some flypaper inside the lid. Every three to six months, move the compost to one side of the bin, and add new bedding to the empty half. At these times, add food wastes to the new bedding only. Within one month, the worms will crawl over to the new bedding and the finished compost on the "old" side can be harvested. New bedding can then be added to the "old" side.
Heap composting
 Figure 6
The width and height of a compost heap — the length can vary according to the materials available.
Heap composting is similar to turning-unit and holding-unit composting except that it does not require a structure (Figure 6). The heap should measure about 5 feet wide and 3 feet high; its length will vary depending upon the amount of materials used.
The pile may be turned regularly or not at all. If the heap will be turned, vegetable and fruit scraps can be added (check with local authorities for ordinances that may be in effect for composting). If the pile will not be turned, adding vegetative waste may attract pests.
Incorporation
Incorporating food wastes into the soil well below ground surface is the simplest method for composting non-fatty food wastes. With time, the wastes will break down to fertilize established or future plantings. The wastes will decompose in one month to one year, depending on the soil temperature, the number of organisms in the soil, and the carbon content of the wastes.
Non-fatty food wastes can be incorporated outside the drip line of trees or shrubs, or buried in areas that are not being used to grow plants. The hole must be large enough to allow the waste to be buried under at least 8 inches of soil. Burying to this depth discourages animals from digging up the waste.
Chopped food wastes should be mixed into the soil before they are buried. Care must be taken to avoid damaging large roots when digging near trees and shrubs. Incorporation of meat, bones, or other fatty food wastes are not recommended as they may attract pests.
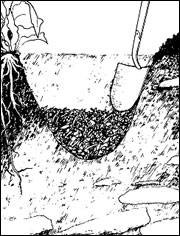 Figure 7
Soil incorporation is a useful composting technique if you need to dispose of small amounts of food waste. Waste is mixed with soil to speed decomposition and covered with at least 8 inches of additional soil.